A Petrín for the 21st Century: my Journey into Carbon Neutral Baking

By 2015 I had spent a decade leading and building a new company, l’d become a workaholic and my work/life needed balance and time to find a new direction. Baking helped provide the headspace to make that change.

My baking journey began in 2010 when my wife booked me onto a sourdough baking course at Natural Bread near Oxford and I took a trip round Wessex Mill, also in Oxfordshire. I came home with the flu but also with some beautiful loaves. I was smitten. I began baking sourdough regularly. Not pretty loaves, but strongly sour in flavour. You can’t buy bread like that. I was also inspired by the mill printing the name of the farm on each bag of flour. That’s provenance.

The sourdough and my love of Neapolitan pizza melded. I built a one-metre diameter Pompeii-style brick oven in my back garden to get the best baking results. Months later l’d over-stuffed the family with pizza and I turned to bread baking. Each year I learnt through courses and visits to PANARY in Dorset, Aston’s Bakehouse in Berkshire, The Bertinet Kitchen in Bath as well as Grain and Hearth in Whitstable. I met and was inspired by my baking heroes.

The quality and scale of my home baking grew until someone said my bread reminded her of Poilâne loaves. Then after a local summer fayre, someone rang to say “it reminds me of the bread I ate as a child in Sicily.” That was the lightbulb moment. lt was finally good enough to sell. Then, just after a Rofco oven course at Brook Food in Somerset with Adam Pagor then of Season bakery in Greenwich, I exchanged an ISA for a spiral mixer and a Rofco B40 oven.

By New Year’s Day 2017 I was selling bread baked on a Friday. From strongly aromatic sourdoughs made with organic stoneground flours to orange blossom brioche. By promising loaves to bread-lovers in my neighbourhood to be supplied first thing Saturday morning, I managed to prevent myself from working on Fridays for several years in a tasty form of workaholic therapy. The remainder of the time I worked as a consultant to the pharma and venture capital industry, helping identify some of the most innovative new ideas in medical biotechnology for my clients.

As an aside, I was also exploring off-grid baking and carbon neutrality.  I was sourcing my flour from watermill and windmill-powered millers such as Jonathan Cook at Foster’s Mill (the Prior’s flour) near Cambridge and also Michael Stoate at Stoate’s Flour in Dorset.  I had largely built my brick oven without power tools, compromising to pour the concrete plinth on Christmas eve by using a concrete mixer.  In another strand of analysis, I had noticed the real wizards of bread baking talked about learning to read for the correct development of the dough with your hands as a key part of becoming a master baker.  You can’t do this with an electric mixer, but you can do this if you mix and develop your dough in a madia (Italy), dough trough (UK) or Petrin (France). I had watched Nicolas Supiot‘s almost spiritual experience mixing dough in a petrin as part of his routijne as one of the early Paysanne Boulangers.

I co-designed a French-style wooden petrín (dough trough) with another local artisan, furniture maker Roland Haycraft in Wallingford (Oxfordshire, UK), in a new design which we updated for the 21st century. Our petrín design may be unique because it can be taken apart and stored in its trough, because in its final form it has carry handles, and because it is of a height better suited for a modern stature to avoid back injury. The trough and lid are anti-microbial maple hardwood and the lid and stand can be used together without the trough as a table, held together with marine brass sprung clips. The trough itself is held together with joinery making it hygeinic and strong, with no gaps into which levain could seep. The legs and shelf which form the stand are made of quality dense pine. This petrín can probably hold well in excess of 60kg of dough through batch fermentation. It is also an excellent container in which to let the bread prove.

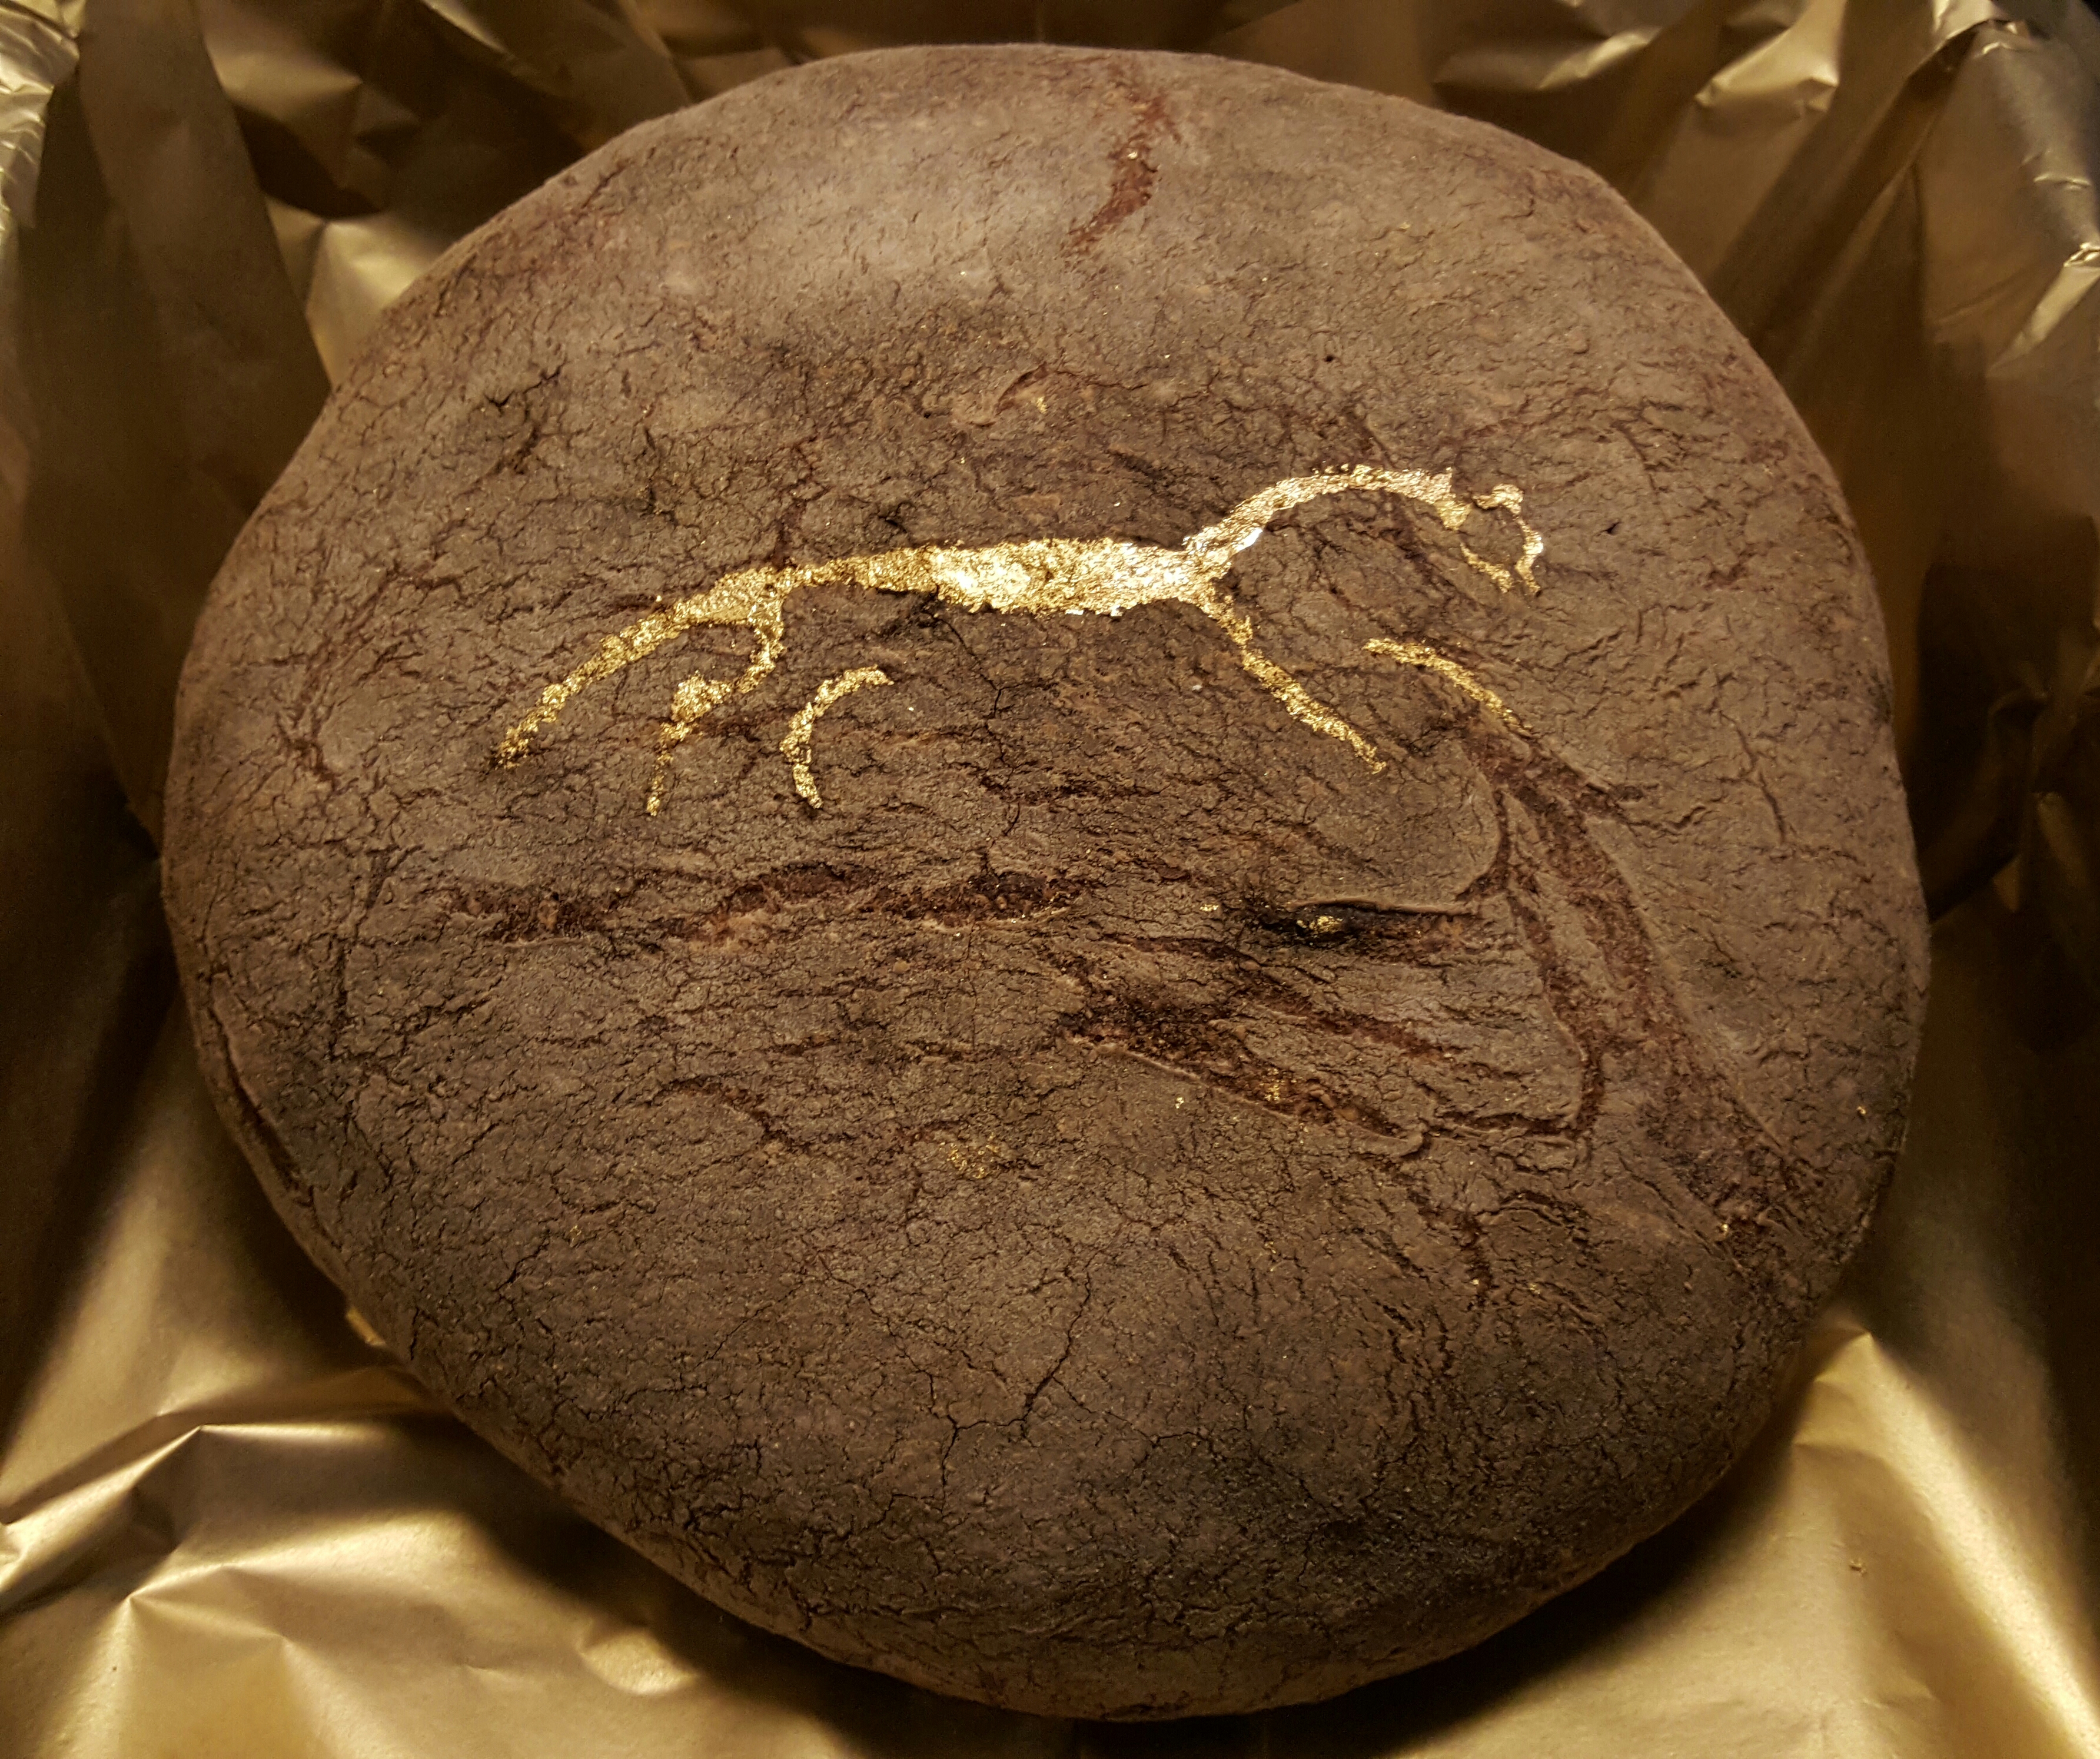
I experimented with making real sourdough made without any electricity using just organic, stoneground flour from Foster’s Mill near Cambridge, tap water and unrefined sea salt. The dough was hand mixed and baked in my brick oven, fired only with wood from local, sustainable sources. I’ve included a picture of the “Windmill Sourdough” I made back in 2018 below, sold in the Hayfield Deli in Jericho at the time.

What I found was that entirely off-grid baking in South-East England isn’t a financially sustainable proposition because the total cost (and component costs) are very high compared to what most people are willing to pay for a loaf of bread. The subsequent inflationary years mean that even those artisans baking with fully automatic and electrically-heated ovens struggle to make their businesses work. For my purposes, I returned quickly to using my Rofco B40.

But my experience does prove we can make bread entirely without the electrical grid. And the flavour and the experience is very special. I believe that brick oven bread is better than all else, while hand mixing makes the cost of getting into micro-baking and homebaking very low, while we learn the key fundamental: we must be capable of interpretting the development of the dough by touch alone. A mixer will never do that as well as a human.

And baking is also a little like fishing. Anglers don’t sit by the river, or cast off from the beach, for many many hours on end in all weather solely for the purposes of catching fish. We bake because somehow the experience takes us closer to something, it allows us to relax, and because we become closer to our selves by baking bread.

Please consider following this blog and in return I will post some of the most popular recipes I developed on my baking Fridays from 2017-2020, including my take on Roman Army Bread.

[Based on an article I wrote which was first published in The Real Bread magazine in 2018]

Posted in Uncategorized | Leave a comment

Tips for sourdough beginners that almost never get shared

I’ve been baking sourdough for over a decade. It is somewhere between an art and science. Some of the most important things about making sourdough as a beginner are often not spoken about or lost in the haze of too many instructions. I find the most frustrating omission how long you should “knead” or develop dough, which I believe means most beginners just don’t do this for long enough. It is a crucial instruction. I bake in the central England UK, a fairly Northern European climate where typically the microbakery is between 18-22ºC, so these tips might need adjusting if you live somewhere warmer. I assume you are baking with flour, water and salt. Here I’ve put together a “baker’s dozen” of tips so you don’t make the mistakes I made.

  • Organic flour in levain Use mostly organic rye flour in your starter and refreshes, and warm filtered water (35-40ºC)
  • Three refreshes Before you bake refresh the levain thrice at 8-12 hour intervals. Here’s a healthy looking levain from my microbakery, ready to use. It appears to be on a “rolling boil”, but really it isn’t moving anywhere near as fast as a pan of boiling pasta. If you tap the bowl, a bunch of air bubbles will appear.
  • Soak the flour to hydrate it. For best results pre-soak the flour and the water for 20-120 minutes before you add salt or levain, mixed without developing. Then add levain, salt, mix and develop. Minimum 10 mins. If you develop the dough before the gluten is equally hydrated, you won’t get best results.
  • How long to mix? If you develop the dough (actually the gluten) with a machine, do it gently for 5-8 minutes (or 10 minutes on slowest setting). Don’t batter the dough! A sourdough which has had a pre-soak and has been sufficiently developed, at 70% hydration will hardly be stick and will form a coherent ball of dough. It will not leave dough on your surfaces, nor your hands.
  • Timetable: Start when you wake up. Let the dough bulk ferment for 5 hours. Try folding it gently, but only in the first 2.5 hours. You can’t learn to love a hobby you lose sleep for.
  • How to stop things sticking: Use water not oil on your hands, scraper and surface, to stop things sticking. Use oil not water on a large plastic lunch box in which you let the dough bulk ferment.
  • Avoid high hydration “machismo” – Don’t use more than 70% water to begin with, perhaps start at 65% – it is easier to handle (eg. 650g water for 1000g dough)
  • Looonger proofs– When you shape your loaf (tin or banneton), leave it to proof (final rise) for 4-6 hours. Yes – that long. If it overflows consider whether the container wasn’t big enough.
  • Store sourdough mother in the fridge if you can’t sustain eternal refreshes. Loose glass lid jar wrapped. Refresh every two weeks. I favour glass APS Weck jars (see below).
  • Simple starter – Levain refreshes with rye are easy to handle at 75% hydration (75g water, 100g rye flour, 35g levain), and rye only seems to reduce the chance of bad bugs infecting your levain. These amounts are -ish and approximate if you are home baking. Don’t sweat it.
  • Steam Add steam when you bake your loaf (except electric ovens, water can break them) using a handheld garden spray (not used for anything else obv). Start the bake hot (250C), let steam out after 8 mins, and bake remainder time at 190C (lower if fan). Don’t spray glass oven bulb housing or it will be shatter – speaking of personal experience…
  • 20% levain If you use 1kg of flour, use 200g of levain. Don’t play with percentages until you’ve learned the craft. Remember that baker’s percentages are percent of flour weight.
  • Always add some wholemeal – I would say don’t bother making white sourdough, always use at least 10% rye, 10% wholemeal wheat unless fibre is bad for you. I rarely make any less than 50% wholemeal for home use. “Because your bowels are worth it!”
APS Weck Jar - 160ml 5.65oz (Box 12)
Posted in Uncategorized | Leave a comment

Building my Wood-Fired Brick Oven – Part 4 – Preparing to Build the Dome

This is the fourth part of my “Building my Wood-Fired Brick Oven” post series, which is all about laying the bricks which form the dome on a Pompeii style wood-fired brick oven. The dome contains the medium-density firebricks which will store, retain and radiate the heat which cooks your food. The structure needs to be self-supporting, and your handiwork needs to be good enough not to require frequent repairs: access inside the structure is limited by the door size, and repairs inside a domestic size brick dome are claustrophobic and messy. This post follows a previous post about “laying the blockwork table“.

In the last post, I skimped a little on the nature of the horizonal concrete slab which I’ll describe a little now. Once I had the blocks laid, I basically had three sides of a structure. The next part is the “table top” which sits a top that structure on which the dome is built. To pour a concrete table top you want to neat bit of formwork. My table top is about 3.5 inches (9cm) depth, which is probably a little excessive, and that excess mass steals more heat from the structure above it than is ideal.

I cut a large medium-density fibreboard sheet to support the concrete slab, and supported it with freestanding blocks, as well as battening screwed to the inside of the blockwork. I attached scaffolding planks and old skirting board as formwork to prevent the concrete flowing out, providing sides, which I painted briefly with lamp paraffin so the concrete wouldn’t stick to them. These were crudely attached to each other with screws to form a square. To make a very strong structure, I lay a layer of 6mm rebar mesh, four concrete lintels evenly spaced (1200 x 100 x 65mm), and more layers of 6mm rebar mesh inside the form. Because my concrete blocks are hollow, and I didn’t fill them, I had to cap them off to prevent the “table pour” from flowing inside them. To do this plugging up, I mortared cinder block plugs – cut to size with a standard timber saw.

The first consideration for the table top is how strong a concrete mix to pour. I used a C35Pmix, which is 1:2:2 cement:sand:aggregate, and it was around 0.175 cu m. This was the first point of the project at which I hired a cement mixer. Because I ended up pouring this in cold weather, I added a frostproofer and accelerant which I will not describe here. After the table top pour, I let the concrete sit for 2-3 hours and covered with a tarpaulin tied around with a few metres of bungy rope. Concrete does not set by evaporation, the water becomes part of the structure and strength, but we don’t want to add more water. It rains in England, and rain could also weaken it.

The next step, a few days later, was to lay an insulation layer. The table top weighs about 500kg, and given concrete has a specific heat capacity of 880 Joules/kg.K, its going take 220MJ to heat it up by 500ºC (our target temperature for the dome, if we are cooking pizza). So at normal wood burning efficiency, achieving about 9.4GJ/tonne, we’d be burning 23kg of hardwood just to heat up the table top. The bigger downside is that the tabletop isn’t built of materials that should withstand these temperatures, so we can’t afford to let it get anywhere near this hot. So – we’ve got to insulate it.

The answer is at least 6 inches of vermiculite:cement (5:1) as an insulation layer. First of all wet the vermiculite, then mix in the cement. In my case I ended up adding a little more cement. I shoveled the wet mix into the formwork, and flattened it down with a plastering hawk. The vermiculite is also a gardening material, and can cost a pretty penny in small quantities. You should be able to obtain it for £20-30 per 100 litre sack in the UK. Four years on, and looking back I will use insulation boards for my next oven. For a more efficient thermal lining try calcium silicate insulation boards or microporous insultation board from a specialist like Kiln Linings in the UK, or your local country equivalent. After several hours of firing, my concrete table becomes warm. Even if the dome is running at 300ºC, I’ve still used up precious wood to heat up the concrete, which is unnecessary with modern materials. In addition, the vermiculite concrete remained slightly soft which isn’t ideal given the massive weight of the dome you are about to built atop.

The next stage is the first brick layer, which is very very exciting. I bought medium density fire bricks (42GD – 230 x 114 x 76mm, 42% alumina) from Kiln Linings in the UK. I think I used about 140. I paid about £1.30 per firebrick, not including shipping, which will be a lot because of the mass (3-5kg per brick). Apart from the base, I built most of the dome with half-bricks. You can buy lots of different sizes, but it isn’t hard to split them in two with a brick bolster, so I’d stick to buying special sizes for an arch (eg. the oven opening). There are plenty of others describing using red wirecut brick, which you can obtain used from a reclamation yard, or for £0.40-0.50 each new from a builders merchant. I suspect engineering brick is OK for low use ovens, and standard soft clay housebricks for party ovens, but I wouldn’t use them for bread baking.

The first brick laying job is the herringbone brick oven floor (the “hearth”). It is best to lay the bricks so their edges are at 45º to where the door will be. This is because metal peels can catch on uneven surfaces, for example, if one brick is slightly taller or another sinks 1mm. I started the process by laying the bricks out in the pattern I would use, to better visualize it. I used a 230mm corded angle grinder to cut the bricks on the edge, marking them up with a nice soft B pencil, and wearing a mask, safety equipment and non-flammable clothing. Before you use an angle grinder, make sure to study the safety aspects for a sufficient length of time – you’ve only got eight fingers and two thumbs…

Once I was ready to start laying the fire hearth, I mixed up a small batch of “fire mortar”. This is a really cool type of mortar which you will also used to cement the dome bricks together. It has refractory properties for heat, and does not fall apart under hundreds of firings in the way standard housebrick mortar might.

Fire mortar is made from “fire clay” which is hard to obtain. I got 50kg from Kiln Linings for my project, which was more than enough.

I used the Fornobravo recipe for fire mortar, but their forum and website is definitely with a whirl. I only mixed what I could use within about an hour, but I did find on hot days I needed to slightly shower the mix with a watering can to keep it to a nice slippery consistency.

Mixing up fire mortar is fairly backbreaking work, which I did on an 1.5m square MDF sheet (about 2cm deep)
1 part portland cement
3 parts sand (soft builders sand, as this is a mortar – not sharp sand)
1 part lime (Hydrated lime – don’t use quicklime, too hazardous for domestic use)
1 part fire clay (from Kiln Linings)

Safety: This is mask work, I used a dust mask and goggles.

I tended to start with the sand, then fireclay, cement and lime, mix them together dry – then add the water using a watering can. The quicker you are covering the cement and lime with sand, the better – in terms of keeping the dust down. As I live in the UK, the sand was always slightly damp – so it may be worth very slightly wetting the sand to minimise dust if it is more than 25ºC when you mortar. I kept a full watering can with sprinkler nozzle on hand just for this.

My maximum batch started with 6 shovel fulls of sand, 2 each of everything else.

I found a folding military entrenching shovel (widely available) good for measuring, with smaller batches. And a value square mouth shovel otherwise. Don’t go too cheap, because you’ll be moving hundreds of pounds of material with this, and the really cheap ones weigh a lot on top of that. Later on, my back was suffering from using these relatively short shovels, and I resorted to an long-handled irish shovel to mix mortar, and later the render coats.

Posted in Uncategorized | Tagged , , , , , | Leave a comment

Golden White Horse Miche

Sometime you get a vision for something, and no matter if it takes a few years you’ve just got to create it.  My vision was to combine a number of things which were difficult in themselves into a spectacular loaf of amazing bread.  I grew up near the Ridgeway and as a toddler walked the windy flintstone laden hills and saw the mystical and ancient White Horse of Uffington before I could even speak.  I ate bread made by my mother with flour grown around those hills, milled at Wessex Mill in the nearby market town of Wantage.  We moved away, I grew up, went to University and became a scientist – returning to the shire to research plant sciences at the University Oxford, then became a project manager, then CEO and built a small company.  To help de-stress from my executive role I began to take baking courses, returning to Wantage to run a course by the founder of the Natural Bread Company.

gold miche 20170714_210202

White Horse Bakehouse special: The Golden White Horse Miche

Many courses later, I drove near the Ridgeway to the Berkshire Downs to spend my 44th Birthday at Syd Aston’s Aston’s Bakehouse.  There is something about those hills.  It might be that because I was partially deaf as a toddler, certain images were seared into my memory, with the the texture of crumbly limestone between my fingers vs. the hardness of the flintstone strewn across the Ridgeway.  A few weeks after spending the day at Aston’s I took my young family to see the White Horse of Uffington.  With every passing month, I was identifying and solving the remaining problems in achieving the vision I’d have of my ultimate miche, and discovering how to overcome limitations with my own sourdough bread making.  The feedback from giving my loaves away was becoming so positive, I got the feeling I could sell my bread.  I should call it the “White Horse Bakehouse”, linked to my own childhood – but at up to 3,500 years old the reference to the White Horse signifies a return to earlier principles.

We are returning to purity in bread because of the crap that the large baking corporates are adding to your children’s food.  Crap like calcium proprionate (sold as “Probake CP” and “CrystalPro”) which on packaging  on UK supermarket bread is described as inhibiting mould growth.  According to a review in LiveStrong, a peer-reviewed research paper published in the Journal of Pediatric Medicine in 2002 describes the results of a clinical trial in which they found propionate induces “irritability, restlessness, inattention and sleep disturbance in some children – ie. causes behavioural issues and suffering.  A large loaf might contain 4g of this nasty.  Funnily enough, my sourdough doesn’t tend to ever mould – it just gets dry.

Just because you can’t prove it kills you, doesn’t mean you should allow it in your food.  If you wouldn’t eat a spoonful of it in one sitting, don’t eat a spoonful of it in your lifetime. If it isn’t food, don’t add it to your food. Purity over poison.

In the West, we only stopped using wood-fired brick ovens in the last 100 years – so I built such an oven in my yard – to know first hand how the best bread should taste.  I will not use artificial additives.  I will use stoneground flour, I will shape by hand, I will use unrefined salt, I will bake on stone, I will use organic flour in my bread, everything will be of this Earth – but should taste like nothing on this planet.  Convenience is killing us.  We’ve got to stop treated industrial fakefood as if it was something to eat.

The polar opposite of sourfaux is the Golden White Horse Miche pictured, weighing in at 2kg, painstakingly decorated with 24 carat edible gold leaf, the dough prepared over several days to a unique proprietary recipe including a secret combination of five of the best flours sourced from artisanal UK millers and unrefined sea salt from Brittany, France.

So the Golden White Horse Miche incorporates the long method, the total absence of convenience, with more class than other gold food.  If you are interesting in ordering this very special loaf, and if money is no object, get in contact via jon.rees@gmail.com


Posted in baking, bread, gold food, organic, stoneground, Uncategorized | Tagged , , , , , , , , | Leave a comment

The Perfectionist’s Pancakes

For several years, I have risen early on a Saturday morning.  I have risen to make pancakes.  I have experimented with many formulas and recipes, but feel that I have finally created a simple and healthy recipe for a pancake which would satisfy the discerning perfectionist.  It has a moist, almost juicy texture – and it is slightly sweet, but not diabetes inducing.  It is hearty but not fatty – it does not clog your heart with melted butter. It is not a crepe, but perhaps its healthy cousin.  For accuracy you must weigh your ingredients, as digital kitchen scales are now inexpensive – you no longer have any excuse to make freehand errors in recipe amounts.

pancake

Some of the key imperfections in pancakes are lumps – my countermeasure is to utilize the blade on a magimix to eliminate any chance of lumps.  I’ve been using these for 20 years, they cannot be faulted for lumpless sauces.  In the UK and certain other places the flour might not be as fine – I suggest using Italian “00” or French Type 45 flour.  I assemble my pancakes batter in the following order 20 minutes prior to the cooking the first pancake on a medium high gas flame, in a 28cm Tefal non-stick frying pan with about one quarter teaspoon of groundnut oil.  I use the latter because it is flavourless, and performs well without burning at high temperatures.

White Horse Pancakes recipe:

225g Type 45 flour (from Shipton Mill)

500g Full fat organic milk

2 Medium free-range chicken eggs (organic eggs often give a good colour to the pancake)

1 teaspoon soft brown cane sugar

Pinch of unrefined sea salt (Sel de Guerande)

Half-a-capful of Nielsen Massey vanilla essence

The method is very simple.  Put all the ingredients in the magimix with the metal blade, and mix for 1 minute.  Pour into a 2 litre glass pyrex bowl.  Now rest the batter for 20 minutes.  This gives the flour particles a chance to swell with milk.  Use a two ounce ladel (holds 60mL) filled to the brim to measure the pancake mix into your hot oiled pan (nearly smoking).  Rotating the pan in a circular motion with your wrist as you pour the batter in to the pan.  After about 1 minute, jerk the pan back and forth to release the pancake (or use a silicone spatula).  When done to perfection put the pancake on a plate lined with kitchen roll.  Continue until you have built a stack.

All utensils except the frying pan will go in the dishwasher, although the magimix plastics last much less long in that case.  I use only two toppings: maple syrup, or light brown sugar and fresh squeezed lemon juice.  Unused batter can be stored in the fridge for 24/48h.  If time is of the essence, get two pans going at once about 90 seconds between pancake pours. Let me know how you get on!

Posted in cooking, pancakes | Tagged , , , , | 1 Comment

Ingredients for a fine handmade pizza

This article was written for a UK audience – we will soon publish this article in American English for the US audience, with links to US vendors for some of the essentials you are going to need.

Although pizza dough is just flour, salt and water with a little leavening agent – if you use plain flour, table salt, cold freshly drawn tap water and an old dog end of yeast the chances are your product will be rubbish. If you use stringy cheap as cheese tinned tomatoes, expect a stringy sauce the will slop sauce over your best shirt, and get between your teeth.  If you use bad cheese, it won’t become suddendly wonderful after baking. No – resolve to use pretty good or the best ingredients, if you can afford them, because them the success of the end result is dependent upon you developing your pizzailo skills, and you can’t blame the ingredients.  Using the same ingredients again and again means you get a chance to hone your skills without experimental variation scuppering the learning process.  As a matter of principle, you should also tour your region’s best pizzerias sampling many pizzas with family, friends and work colleagues because its all about the journey – and there’s no better form of learning than social eating. Don’t be afraid to ask them about their ingedients and watch their processes and skills, let them show off!

20150912_173444_recent_pizza

Here’s one I made earlier: Blue Cheese & Black Olive

The Water – Draw the tap water into a jug or pan the night before, and let is stand overnight (loosely covered) to allow any dissolved chlorine to escape – then use a cheap kitchen thermometer and some boiled water to bring the water temperature up to 26-28ºC

The Salt – Get some unrefined sea salt.  I use ground Sel de Guerande from Le Paludier. It is already fairly well ground so dissolves in water quickly.  I tend to add it dry after I’ve begun to mix the dough, without issues.  Table salt has all sorts of nasty additives as you’ll have read about in our blog post “The Salt of the Earth“.

The Flour – I used to think flour was flour was flour.  Well – it isn’t.  There are more varieties of wheat flour available than there are countries in the world, and many more grain species than wheat. It is safest to do what the Italians do which is to start with Caputo Blue “00” flour (it comes in 1kg and 25kg bags) which is relatively “soft” and will give you an elastic dough, and learn to do good pizza with that.  The move on to Caputo Red and others.  I think good starting points also include Barillo “00” and other Italian “00” flours.

The Yeast – Of course it would be nice if we all made sourdough pizza bases.  I bake 50 loaves of bread every other Friday, including mostly sourdough.  But when I’m cooking up pizza from scratch even I do not reach the heady heights of homebrew sourdough pizza bases.  Just use Doves Farm Quick Yeast – it should be £1.50-3.50.  It works really well – you need about 1 teaspoon per kilo of flour.  We are not all Franco Mancy, but they are.

The Tomatoes are also all important.  Buy some tinned San Marzano tomatoes. These are sweet saucy sauce tomatoes that melt into instant pizza sauce when squeezed through your fingers. San Marzano tomatoes are grown near the base of Vesuvius near Napoli and are an essential component to creating the best pizza that you can.  Very good Italian tomatoes are an alternative – but please do try these before you resort to that.  I’ll leave you to choose the cheese. Good luck!

Posted in baking, cooking, pizza | Tagged | 2 Comments

Building my Wood-Fired Brick Oven – Part 3 – Laying the Blockwork Table

This is the third part of my “Building my Wood-Fired Brick Oven” post series, which is all about laying the blockwork structure on which the “table” will be supported.  It is on this concrete table you will build the oven hearth, the bricks on which you will cook.  The first post was about digging the hole for the foundation, and the second post was about
laying the foundation slab.

A wood-fired oven is usually built on block_arrived_pile_strapped_up_2013-02-07 16.00.23.jpga fairly sturdy support. I think the most conveient way to do this is to create a 3-sided structure out of concrete blocks, and to either lay a piece of made to measure concrete on top, or pour a concrete table into formwork on top.  By concrete block I mean aggregate concrete blocks.  The blocks I used weigh around 50lbs each, so you need orange rubber builders gloves to avoid shredding your hands.

When laying block there are two main ways to go: you can either lay them like brick, using mortar in between them, or you can lay them on top of each loose_blocks_2013-10-30 09.49.01.jpg
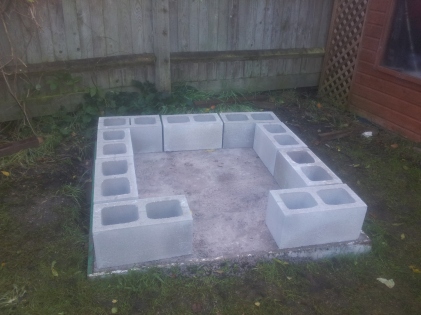
other – and pour concrete into the holes to form concrete cores.  The latter method can be made stronger by inserting lengths of rebar prior to pouring in the concrete.  Remember – concrete sets by a chemical reaction, not the same as drying – so it doesn’t matter some concrete will never see the light of day.  In my project I used mortar, and learned to lay block by watching youtube videos, and used spirit levels.  I wouldn’t recommened doing that, as if you are laying block for the first time, your mortar thicknesses will vary by more than the inter-block variation, so you will introduce error.  Better slap some mortar down where you are building, and lay the blocks in place – then mix and pour a bunch of concrete into the cores – quicker, but more expensive for you and the environment. Before I started, I tried to get an idea of how it would look by laying the bricks out.  Abthree_layers_concrete_armchair_2013-11-10 11.55.07out one if four blocks is going to be a “splitter” with readymade  blocks with asplitting line built in.  You can see one on the right in the picture at the top of this page.  To split block you need a 3-4lb lump hammer and a brick bolster, and you tap it hard vertically on either side of the readymade split until it breaks.  Just make sure to do it on a hard surface, like the foundation.  I split most of mine on an old sleeper. You can see the nearly finished structure on the right.  About 6 more blocks to lay.  The beauty of the 3 sided structure, is that your wood-storage structure is immediately below the oven. The fullsteel_mesh_2013-11-24 15.37.12pile_of_bricks_as_insurance_for_collapse_of_plinth_2013-12-30 16.34.05 bright
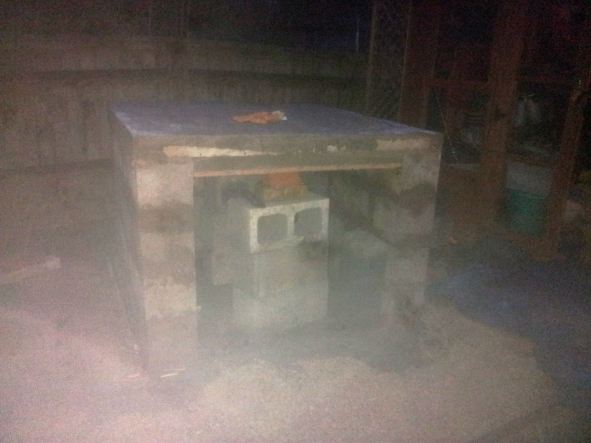
y finished structure is pictured below, ignore the steel mesh I was just storing them there.  But they are cut to size for the next part, which is to reinforce a concrete plinth which will be poured onto formwork above the concrete block support structure.

I did not take photographs of the structure of the conrete plinth, but I will write down what I did.  Firstly I screwed battening onto the inside of my structure, just below the level of the top of the blocks, and dropped a cut-to-size piece of MDF, filling in the gaps with offcuts and this and that.   This provides the surface onto which the concrete will be poured.  Then I created a frame out of 6×1 inch reclaimed planks, which I attached to the outside of the structure, effectively forming a lip beyond which the concrete could not leak down the sides. I did two main pours, firstly a 2 inch concrete pour to form a base structure which would hold a much heavier layer. This contains a piece of steel mesh.  A few days later I lay three lintles across the structure, one at the front, one in the middle and one at the back.  Between the lintels I lay pieces of steel mesh, and a further steel mesh layers across the top. I used a strong concrete mix for this “table” because it would have a big job to do later on.  Holding up a dome made of hundreds of half-bricks.  I used  C35Pmix, being a mix of 1 part portland cement, 1 gravel and 2 of sharp sand.  I used Wickes Sharp Sand (£2.30 a bag) and Mastercrete Original Cement (£6/bag) both of which weigh 25kg per bag.  The table weighs about 800kg and contains upto 12 bags of aggregate, 12 bags of sand and 6 bags of concrete. I used reinforced lintels which is further over-engineering, just make sure you get the size, as you don’t want to be (attempting) to cut these.  Once poured, I laid a tarp over my structure, and wrapped it around with bungee rope.  Once set – it is probably true that you could survive in the structure if a tank was dropped on it – but then – that gives comfort because you’ll be building a bloody great fire in a structure on it, and it wouldn’t be very nice if it collapsed.  For better or worse, these things will survive all of us.


Posted in Uncategorized | 4 Comments

The Salt of the Earth

My microbakery, the White Horse Bakehouse, does not use industrial salt in its products, I use only Sel de Guérande, which in my opinion qualifies as The Salt of the Earth. I never use Table Salt at home, except in cleaning. You can see some slightly ground Sel de Guérande, and some coarse Sel de Guérande in the photograph I’ve included below, I use the one on the left in baking or grind the coarse version in a mill.  The first thing you will note is that sea salt shouldn’t be clear or white, it should have a colour (gray in this case).  The crystalline and pure white “sea salt” flogged by supermarkets and marketeers just isn’t the real deal folks – but table salt is the pits.
20170108_140753.jpg

While table salt is 38.8% sodium (being about 99% sodium chloride, most of the remainder being chlorine), the Sel de Guérande I use is about 35.2% sodium, that’s about 10% less sodium. Sel de Guérande is a particular kind of sea salt made in France. It is sel gris, meaning gray salt, because it is the product of sea water evaporation powered by the sun – so it retains all the minerals in sea water. This means it also contains magnesium, potassium, calcium, manganese, copper, sulpher, zinc, iodine, flourine, cadmium and iron.

Table: Mineral content of some hand harvested Sel de Guérande from my cook shelf

Mineral      Content per 100g
Magnesium 420mg
Calcium 152mg
Iron 17.5mg

The lower sodium content of sea salt is partly because it contains more water, but also because it contains many other minerals essential for life. This contrasts with “table salt” which I do not use, which often contains an anti-caking agent agent sodium hexacyanoferrate and also as sodium ferrocyanide (E535) – see below, or even sodium aluminosilicate which contains aluminium that I suspect you’d rather avoid.  Importantly, when you take a pinch of table salt you pick up a greater weight of salt than a pinch of sel de gris, so you use less sodium if/when you season the food on your plate – this has something to do with the way in which pure sodium chloride crystals can pack together without much air between them I think, while the irregular mess of sel de gris contains more air.

Though the salt I use already contains less sodium, I am aiming for our bread to contain no more than the equivalent of about sodium chloride (common salt) during 2017. Around 17% of dietary salt comes from bread in the UK, so it is important to check that all your sources of bread do this. Guérande is a medieval town in the coastal region Loire-Atlantique in Brittany, Western France not far from Nantes.

White Horse Bakehouse uses a Sel de Guérande moulis, which is slightly finer than the coarse granular form in which sel gris is often times supplied, which means I do not employ a separate salt dissolving process when I make the dough. So, rather than sacrifice quality and nutrition to satisfy an industrial process, I select or adapt an appropriate nutritionally ingredient into a thousands of years old process.  Find out more about White Horse Bakeshouse on our Facebook Group.

Why I don’t use salt containing E535 – or “Sodium Ferrocyanide is not food”
These pale yellow crytasls are also used as a stabilizer for the coating on welding rods – and no, it isn’t food and I don’t think it should be in food – do you? The material safety data sheet for E535  clearly states it is extremely hazardous if ingested, and is a skin and eye irritant, toxic to blood, lungs, mucous membranes and can cause organ damage. It decomposes at 435ºC, so would decompose in pizza dough cooked at the recommended temperature 475-500ºC, releasing highly toxic fumes of cyanides/ferrocyanides. Best avoid.

Posted in baking, cooking, Uncategorized | Tagged , , , , , | 1 Comment

Real Bread bakeries in and near Oxford

Artisan Bakeries and Real Bread in particular is on the rise across the UK, but it isn’t always easy to find out where to get it. In and around Oxford there are a growing number of Real Bread outlets available, but as no-one had made a list – I thought that I should.

“Real Bread” actually means something: the bread must be made with flour, water, salt and a leaven (sourdough or yeast), rather than a bunch of dodgy additives you wouldn’t consume if they were offered to you as the white/grey powders that they are. In addition, “Real Bread” bakeries tend to have finer ingredients, and use naturally length processes which allows for fullsome flavour development. This is then reflected in the price.  Even so, bakeries are small margin businesses, and are difficult to break-even businesses until they have a little scale.  This means that if you want to hold on to good bread, you should support the bakeries that provide this in your community or risk things returning to the bland doughey bread desert of the 1970’s and 1980’s.

The other cost of consuming industrial bread is the use of palm oil (eg. in Hovis and other many major brands) – bad for the environment, but the anti-mould agents in British supermarket bread are banned elsewhere and some scientists think the emulsifiers are linked to inflammatory bowel disease, Crohns and ulcerative colitis. If you are like me, and you’d rather take the precautionary principle and eat great tasting bread – focus on Real Bread. In this very brief review, I’m noting where you can buy Real Bread baked around here, comments and corrections welcome.

White Horse Bakehouse – This is my occasional only microbakery based in the heart of Iffley Fields, in the “Republic of East Oxford” producing just 20-30 loaves every week or two. Our Signature bread is the “White Horse Sourdough” which is probably the tangiest sour available in Oxfordshire. I bake bread on a stone hearth lined oven, and from time-to-time do specials in a wood-fired brick oven. I currently operate exclusively through a Facebook group, in which bread fans are informed when a bake is upcoming. Most of our products are organic. We have no shop front, so don’t waste your time looking for one! Join now.

Astons Bakehouse – A completely organic bakery supplying Oxfordshire and London, created by one of the founding fathers of organic bread baking in the UK. Amazingly produces organic croissant and pain au chocolat. Based at Sheepdrove Organic Farm near Lambourn, in the picturesque heart of the North Wessex Downs. Syd Aston’s bakery produces a lighter form of sourdough, which is proving popular here in Oxford. Available from Wild Honey on 111 Magdalen Road, Oxford OX4 1RQ, and 12 South Parade, Oxford OX2 7JL.  Extensively supplying many London markets, with particularly excellent sourdough from 400g loaves to 20lb pagnotas!   Aston’s has no shop front, but Syd has kindly let me visit by prior arrangement.

Natural Bread Company – Baking in an Oxford City based Bakery, Natural Bread has three main outlets which are cafés in Oxford (29 Little Clarendon Street OX1 2HU), Woodstock (30 High Street OX20 1TG) and a shop in  Eynsham (1 Mill Street OX29 4JX). This is good solid sourdough, which is tangy and can be well toasted. Founded by William Black and Claire Véry, who also founded Appleton Farmers Market back in 2006. Their bread is also available in outlets including Appleton Community Shop, the Beetroot Pantry (Cowley Road, Oxford), GÄF (Magdalen Road, Oxford), The Postbox (Wolvercote Village, near Oxford), 2 North Parade (Summertown, Oxford) and the Barefoot Kitchen (Jericho, Oxford). William was my first bread baking teacher.

Modern Baker is at 214a Banbury Road, Summertown, Oxford OX2 7BY and bakes organic bread on the premises, which is also a little café.  Melissa’s place makes some of the usual craft loaves as well as pretty amazing products including two gluten-free loaves (yes, actually gluten free!), sourdough baguette, sprouted wholewheat, the superloaf (quinoa, chia and kamut) and a couple of rye loaves. Due to demand, the café will be expanding throughough the facility, and bakery will be relocating to nearby Kidlington still supplying its local shopfront.

Degustibus is an artisan bakery in Abingdon run by Dan Degustibus, which through distributors Silver Fork delivers to Oxford, and via the The Market Garden delivers elsewhere to certain villages in Oxon.  I’ve only eaten his bread via the Country Grains shopfront on Botley Road, Oxford – but he’s got some great fans.  It looks like his Aelfric Sour is one of a number of pure sour (ie. no commercial yeast added) – pictures here, the bagels look awesome and he does do a 100% rye sourdough (though it appears yeast is added in this case).  Also does a traditional range of farmhouse, bloomer and sandwich loaves which appear to be produced to a high standard.  Won a Muddy Stiletto award recently. Dan’s bread is available at North Parade Market on the 2nd and 4th Saturdays each month between 10AM – 2PM.

Bakergirl is a Banbury-based artisan bakehouse and barn café at Wykham Park Farm near Banbury (OX16 9UP), founded by ex-London bakers.  I haven’t visited this one – but the environment looks stunning!

The Old Farmhouse Bakery, Steventon
By far the most difficult to find, located through a farmgate across the village green in Steventon, next to a new houseing development. I have in the past become reliant on their delicious fresh Quiches. Founded in 1982, inspired by a desire to maintain the supply of Real Bread, the bakery utilizes a 77 year-old brick oven built in 1938. Their sweet treats and hedgehog rolls are particular good for kids. Also does farmers markets in Banbury, Summertown (Oxford), Didcot, Abingdon, Woodstock and Reading.

Marcopolo Bakery, Wantage
Marocpolo using locally sourced flour milled at Wessex Mill, and makes their bread available at their bakery shop, but it is also extensively available through other outlets South of Oxford, eg. Q-Gardens on Harwell Hill, but also available at Farmers markets in Oxford, Wantage, Malborough, Witney. Fairly traditional flavours, less than tangy sourdough, but bread that looks nice.

Another is Silvie which is a bakery café at 281 Iffley Road, in East Oxford which does a variety of good breads, including real bread made locally by Natural Bread Company and another local bakery, and developing its in house soda bread and others soon.  Then there’s Bannister’s at 245 Iffley Road, in East Oxford which does sell the odd basic loaf baked on the premises – however – I value them mainly for their legendary blueberry pancakes with bacon and maple syrups. Another good outlet is “Country Grains” café at 69 Botley Road, Oxford which sources its bread from German-style Artisan baker Dan Degustibus in Abingdon (Oxon) – I have heard that their brazil nut loaf is good.

Others bakeries worth a mention are GAIL’s in Summertown, but unfortunately their bread is baked in their central bakery in London and shipped to Oxford, and I’ve heard it includes additives – which may have been a good business model, and it is good bread – but the shipping of the bread adds time and delay – and it just isn’t what I mean by local produce.

Other bakeries of note which I think might not be offering “Real Bread” are Gatineau in Summertown, Oxford which has the most amazing tasting and spectacular looking bread and pastries, and the Maison Blanc on the Woodstock Road in Oxford – which I believe was Raymond Blanc’s first outlet in the UK.  If I’ve missed anything out, or got anything wrong – let me know and I’ll endeavour to update every so often.


Posted in baking, bread, Uncategorized | Tagged , , , , , , , , , | 1 Comment

A visit to a Wood-Fired Bakery in Kefalonia

Although not all aspects of our family vacations are oriented around baking – I feel that it is important to try the local bread and other bakery products where I visit.  Last year, in early June 2015, while on a family visit to Kefalonia, I had been asking around about whether there were any wood-fired bakeries on the island.  Indeed there was – I was told of an old wood-fired bakery in Agia Efimia, which is a little port town on the Eastern seaboard of Kefalonia, facing out toward the Southernmost tip of Ithaca.  Being popular with sailboat tourists, without port industry, the town may have lost some of its individual character in adapting to the needs of a homogenous class of middle-class European consumers, which differentiates it negatively from more residential Ionian ports of call.

However, the historic wood-fired bakery is Agia Efimia’s saving grace – making our two hour drive from the South coast well worth the effort. We arrived in the mid-afternoon, toward the end of a typical long day in the bakery. The husband and wife bakers were readying the bakery for the following day, in heat of around 30ºC, and yet still made the time for me to take a look inside the cavernous oven – with a pretty cast iron exterior.

20150605_173243

The wood-fired bakery in Agia Efimia (June 6, 2015)

A couple of notable features were the height of this old oven was low even for the current generation of bakers, it was lit by an electric lamp during baking observation, and has a simple ash grate to dispose of the products of combustion. The loaves, one of which is pictured below, appear to be baked in close proximity – and are of a sufficient quality that little variation in bread product are required. The oven appeared to be fired with one barrow of wood per day, which in daily use may be all that is required to reach heat.

I had noted in other Kefalonia towns bakers mentioning the use of wood, oil and gas to fire ovens had ceased, for various reasons – including Health & Safety or government directives.  Let’s hope this wood-fired bakery continues the tradition – as its the only reason I will return to Agia Efimia!  For those visiting Kefalonia, there is also a wood-fired pizzeria on the seafront at Poros, being Bello Pizza – purveyors of the finest pizza on the island in the opinion of a food fascist who has eaten there!


Posted in Uncategorized | Leave a comment